Full Belly Fridays-Centennial SMaSH
Cross-posted from 7cubed.ca
No, I’m not destroying anything one hundred years old. This is my first foray in to all-grain brewing!
So, if I’m not breaking stuff, what does SMaSH mean? It’s an acronym for “Single Malt and Single Hop”. The idea behind it is to focus the flavour profile of a beer on a particular hop variety and a particular type of malt. Kind of like Alexander Keith’s “Single Hop” series, except not likely to be bland and unimpressive. I had originally planned to use Cascade hops, but since my local homebrew shop (LHBS) was out of them, I decided to try Centennial.
At this point, I haven’t invested anything in extra hardware. All-grain brewing gear can get pretty complicated, and it seemed like a good idea to keep the volume small to start with. As it happens, Upalong Brewing has a nice 1-gallon SMaSH recipe, and I have a 1-gallon carboy courtesy of my father-in-law.
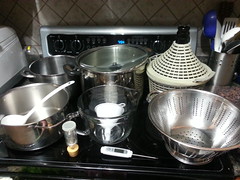 The Gear
As you can see, the majority of equipment needed relates to boiling water. Here’s the breakdown for brew day:
- At least 3 large pots (you may need more, for heating the sparging water); the largest should hold at least 8L
- A jug or carboy; should be around 1 gallon
- At least one measuring cup; I used the largest one I own, which holds up to 2 L
- A colander or strainer that can sit on top of your largest pot; if the holes are fairly large, you might want to line it with cheesecloth
- A funnel for filling the carboy
- A ladle for sparging
- An airlock for the carboy
- A thermometer
- A kitchen scale (not technically necessary, but VERY handy)
The Ingredients
One of the things that drew me to the SMaSH idea is that it’s really simple – one type of malt, and one type of hops. Another recommendation is to go with a relatively “clean” yeast; that is, one that doesn’t tend to contribute a lot of its own flavours. For this batch, I used:
- 2 oz of Centennial hop pellets
- 2 lbs of 2-Row malt
- 1/3 packet of Nottingham yeast
- 7.5 L of filtered water
You’ll also want to have a fair bit of ice on-hand. As you’ll see, shocking the wort in an icewater bath is a critical step, and the faster things cool, the better.
The Process
I managed to take some video with my phone of parts of the process:
From start to finish, the whole thing took 4 hours and 20 minutes. The wort has been fermenting away for nearly a week, and so far everything has gone smoothly.
The aftermath
As I mentioned in the video, I didn’t really want to just get rid of all that spent grain. Garbage was DEFINITELY not an option in my books, but just composting it almost seemed like a waste too*. In my beer-making research, I had heard mention of baking with spent grains, so with a couple of quick searches, I came up with a recipe for dog treats, as well as instructions on how to make flour out of the rest. The 2 lbs of malt, after being soaked, worked out to about 10 cups of spent grains. 4 were earmarked for dog biscuits, and the remaining 6 were slowly dried in the oven, then ground in a food processor.
Have you ever made your own beer, wine, or other alcoholic beverage? Post about your experience in the comments below!
Leave a Reply